On Monday morning, just as I was beginning the drive home to Waterloo from Ottawa, about six hours in the sweltering heat, I discovered that the blower in my truck had stopped working properly. Between the time I gave the truck to my friend Jeff to drive for a day, and the time I got it back, something in the fan control broke. Jeff of course denies any wrongdoing, knowledge of, or involvement in this startling development. I think the facts speak for themselves.
Truck: 2001 Dodge Dakota Quad Cab.
Symptom: Fan only works at highest speed setting. In all lower settings, the fan just turns off.
I suffered with the A/C at full blast the whole drive home (better than turning it off), then hit Google to see if anybody else had encountered this. Turns out it is a somewhat common problem. The fan speeds are controlled by a high-power resistor in series with the fan motor. Apparently it is quite common for these resistors to burn out. This problem affects many makes of car, not just Dodge.
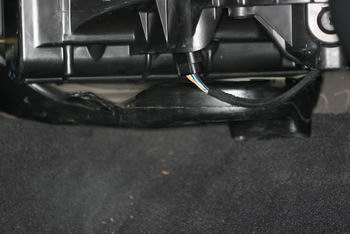 Fortunately, the resistors were quite inexpensive at my dealership’s parts department, and very easily replaced. The resistor comes as a module that is bolted into one of the air plenums in the passenger footwell. On the outside is a wiring connector, similar to the connector on halogen headlight bulbs (and similarly difficult to unplug). The resistors themselves are on a card that sticks inside the air plenum, presumably so the resistors will be cooled by the air flow.
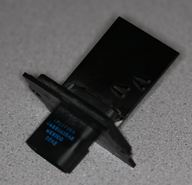 The original appeared to be a card of fibreglass or mica or something, presumably with the resistive elements printed on it, and then painted black. Seemed very cheap to me, I’m not surprised it burned out. When I removed it, it was covered in moisture. And the paint was flaking off in one corner, which probably allowed moisture to seep in to the resistive element and corrode it. Tests with an ohmmeter showed that only two of the five pins appeared to have continuity with each other, the others were all open circuits.
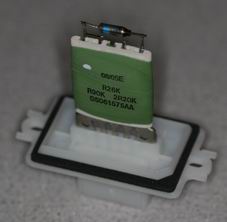 The new resistor card cost me $13. It was somewhat different in design than the original. The replacement is using a ceramic core, with resistance wire wound around it, and dipped in epoxy. This is more like high-power resistors are supposed to be made. On the top is what appears to be a thermal fuse. The new module has continuity with all pins, the resistance to pin 1 from subsequent pins steadily increasing, up to pin 5 which had I think 2 or 3 ohms resistance.
I suspect that the fan speed selector provides power to one of pins 2 through 5, representing speeds from highest to slowest. Pin 1 is then used to supply the motor. Pins 2 through 5 appear to be a 2 or 3 ohm power resistor with multiple taps. The first tap (pin 2) is actually at 0 ohms resistance (pins 1 and 2 are shorted together), giving full voltage to the blower motor.
On the whole, this is actually quite an inefficient motor speed control. At speeds other than off and full-speed, considerable power is wasted as heat in the resistor. A more modern and efficient design would use a switch-mode transistor control. That would allow infinite variation in fan speed, waste less power, and probably last longer too (if implemented properly). It could probably be implemented on a plug-compatible module. That would be an interesting aftermarket part: an infinitely variable fan control. The hard part would be replacing the knob on the console.
354 responses to “Dakota Fan problem”
Same problems with my 2004 Dakota, 3 resistors in 2 years, and burned pins on female harness. Has anyone found this connector other than the $100 part at the dealership? I have a new resistor but am reluctant to install it with that connector.
Another thing that happens is the after you’ve burned out enough resistors (on my 3rd resistor for my 10 year old Dakota)the actual connector that plugs into the resistor may get fried and/or damaged form excessive heat. Dodge sells a repair kit for this connector (The non resister side since the new resister will be all set right?) but they wanted $95 dollars from a dealer for this repair kit. Needless to say, I wasn’t going to pay $95 for a connector “repair” kit. So what I did was I bought a new resister (to replace the fried one) which cost $13 and I went to Radio Shack and bought some butt connectors.
These Butt connectors are round barrel type connectors that are about an 1″ long and the diameter of them was about 1/8 inch. To use them you typically plug a wire in each end of the connector and crimp the wire in to connect the wire. No soldering or anything.
Using butt connectors, what I did was I marked the blower resistor where each wire would have plugged into if the connector were to plug into the resistor. Using the but connectors I bought for $2.50 for a pack of 10, I flattened one end of the butt connector so that it was now oval shaped. The other end of the butt connector I crimped onto each of the wires in the harness. When I was done I had a butt connector on each individual wire (5 wires). I then plugged the appropriate wire into the appropriate spade connector on the new resistor block.
It works like a charm and the best part is it only cost me $2.50. I was concerned about heat build up on the butt connectors since the “official” connector actually got melted a bit…so far, no problems.
I used a die grinder to cut away the plastic around the connections and the new resistor and soldered in wire instead of paying the $100 again for a new harness 1 harness and 2 resistors in 1 and a half years no problems with it did it 1 year ago
meme probleme avec mon dakota 2003 4×4 moteur 4.7litre
meme probleme avec mon dakota 2003 4.7litre 4×4
12/21/09, Drove my son’s truck today a 2003 Dodge Dakota. When I started the truck the fan speed control was on high so I turned it all the way down. I ended up driving a couple of miles and tried to turned the fan on and it wouldn’t come on. Just that quick it quit working. I went through and check all the fuses and was determined it was the climate control swithc gone bad. I researched the internet a couple of different times so i could try and fix it myself. I stumbled upon this blog and found that there seemed to be a consistant issue with the inline resistor for the fan control. Order it the next day for 13.99 and it fixed the problem. Amazing, saved me about $100 not replacing the climate control switches and the trouble of taking it out. The resistor was just like the first blog, located in the passinger floorboard of the truck. After talking with family member on two different vehiles. A 2001 Dodge Grand Caravan and a 2000 Ram truck both are having or have had similar issues. Thanks for the blog….
Same problem as Jay meltdown in 02 Dodge Dakota, and the female receptacle. Looking for replacement female receptacle as the local Dodge dealer was asking $78. for this end of the heater wiring harness. I also have a new resistor but can’t insert it into the receptacle because of the melted plastic. I don’t have a die grinder to modify and remove the melted plastic and really need the new female receptacle with short wires just can’t seem to even locate a used one.
Thanks for the blog pointing out the problem.
I got alot out of your article. My blower fan on my 1988 Dodge Dakota only worked on high … except once and awhile it would work right for all speeds. Thing is, the older models don’t have them where they are on later models. Try as I might, I just couldn’t find it! Went to the dealer and he told me that the older ones are under the hood … I suspect one of those on the firewall or wheel wells area. Well I had an appointment set and it was going to run me a couple hundred and they couldn’t get to it till next week to analyze and then if it was the resistor try to find a replacement. Well when I got home, I decided just for the heck of it to plug and unplug a couple of the little boxes that looked like it might be going to the blower motor. I wiggled others that I was less sure of but might be it. Low and behold now the blower switch works again in all speeds! So a little embarassed I called up the dealer and told him the scoop and that I’d pass on the $45 diagnostic test and go with it as is now that it’s working fine. Now tomorrow it could go out on me but I think in this case it was just a loose wiring situation. Wish all fixes were so easy. 🙂
Thank you, You saved me a lot of time and money! Great Post, This is the first time I’m ever leaving feedback or post.
Thank you, Ron
01 – 04 durango resistor and wire repair kit on e-bay for 60 bucks. I replaced all .resistor, new female clip, now blower moter. IF the blower moter is just alittle tired it WILL melt that female conector. I will probly solder tham on like Serge did and search boneyards for a spare connector. just a BAD design! good luck all.
I changed mine in 7 minutes ! Who can beat that ?
I changed mine in less then 5 minutes in a mcdonalds parking lot lol.
Thanks for the tip. The part was $10.00 and change at the local Dodge dealership in Waterloo. It took longer to go and get the part than it did to change. It works great…..thanks again for the tip and savings.
I googled the problem and it took me right to this site. Mine just quit this week in my 2002 Dakota. I feel lucky mine lasted this long compared to some of the other posts.
I too googled the problem and came to this site. Thanks very much. I really needed it to work properly and had no idea how to fix it. The ventilation was not safe to drive with during the winter!!
I got charged $21.00 for the part and took me about an hour to get it fixed. It wouldn’t connect properly and to had to ‘MacGiver it’ a bit (cut a little bit of plastic back). Now fits nice an’ snug.
Thanks again!
just put a new resistor in on thursday got in my truck on Wednesday had smoke in the cab and was back to only high speed on the heater fan again
Has anyone stopped to ask why so many failures are happening on such a simple piece of equipment.
Judging from the many posts this has been a historical dilemna for Dodge…and the true cause doesn’t get fixed as the dang thing keeps burning up!
Thanks a million for saving me time and most importantly saving me lots of money from being ripped off at the dealer for having them fix it. It really is very easy to replace it.
Thanks again!
Tom
Odd mine lasted 9 years before going out (2001QC), going to pick up the new part tonite.
Thank you for the nice write up.
Googled this issue a few minutes ago. Experienced no fan except on high as other have. Great initial posting and pictures. Pulled resistor and will grab a new one later today. Hopefully will resolve the problem. Dodge Dakota 2004, Q cab.
How do you remove the module from the wiring harness?
Sid
Thanks for the tip. Went to NAPAs today and got the part only to find the same problem as Sid, the harness connector has fused to the part, making it impossible to disconnect. Had to cut my harness – now I’ve got to find a connector! Mine is a 2004 Dodge Dakota – this is the third time this gets replaced, but the first time I do it.
On the wife’s 2004 Dakota the fan just quit. After finding this information, went to work and located the resistor. The connector was difficult to remove since it was fused with the resistor. Wound up cutting the entire connector. Used 0.110 inch female push on connectors and worked fine. Found at the auto store or a Radio Shack. If you want a spare resistor it can be bought on line for about $10 to your mail box. Now since the problem is fixed will look for some heat sinks to add to the resistor to dissipate some more of the heat rather than rely on the air box flow.
Glad to Know this info. did not know it was common with dakotas glad it is a chaep fix. is the replacement form auto part stores a better made part?
Thanks!!!, I found this fantastic blog yesterday after the blower on my 2002 Dakota just quit working all together, no low, no high, nothing. After reading this, I figured that this is my problem. I went to Autozone to pick up the part for 16.99. And the counter worker insisted that this would not work, and my blower itself had to be bad, just because the high setting didn’t work at all. I admit I was suspicious too, so he was able to talk me into buying the blower for 99.99 as well. Last night I removed, and metered the resister and saw various resistances, so I was thinking that the higher cost part was going to fix my problem. Guess what?!! IT WAS THE RESISTER, I’ve always said that the combined knowledge of internet bloggers was way better than any mechanic, or individual auto part worker.
Thank you Ronblog, and Respondents for helping me fix my truck faster than I ever had before.
PS. Autozone better take back that 100 dollar blower, cause I don’t need it.
just bought a used 2003 dakota and found the fan only works in high speed.now i know how to fix it.Thanks alot.
Thank you
I hope to provide everyone with additional valuable information.
1) The main reason for all the problems is that the blower motor’s lubrication dries out due to age, dust and dirt. this binds the shaft and causes the blower to draw too much current. The impeller on a well lubricated motor should spin freely by hand. Too much running time on a motor with dry bearings can burn the insulation on the windings causing shorts that draw even more current than the factory resistors can handle.
2) The connector for the resistor module is a lockon type. You will have to slide the RED lock to one side so that the connector will release. There should be a solid end with a raised part to pull on and you may have a latch lifter in the middle of one side of the connector, where the wires enter the connector. Press the lifter and slide the red locking device out from the solid end. Using a straight blade screw driver and four hands helps. Be careful not to stab yourself or your buddy with the screw driver, it shouldn’t take that much force. After this, the connector should easily release from the module. You may have some other type of locking connector but in most cases it will be locking and you should study it to find out how it unlocks. It is unlikely that the plastic of the connector is melted together, resistors burn up first.
3) The factory replacement part is too weak to last without installing a new blower motor. So I would only go with a new resistor module from an aftermarket provider such as the one found here. Also, these are made in USA and appear to have a thermal cutout on the end of the block (great idea):
http://tinyurl.com/Dodge-Dakota-Blower-Resistors
4) Find your replacement resistors at Autozone or OReily for around $16.00, other places I have found are more expensive.
Now, how can you fix it yourself? It’s fairly easy for most Do-It-Yourselfers.
Remove the passenger side floor duct work (2 screws and it slides off its mating piece). Remove the resistor module and blower in that order. Do them connected together because it is easier to unlock the connector when you have them out of the vehicle and you’re not standing on your head trying to see what you need to do to unlock it. It’s also easier to figure out how your particular connector lock works so you can take it apart. Plus the job may require another pair of hands which is easier done out of the vehicle.
When you get the connector apart, you will need to inspect your motor to decide if it is salvageable or if you will do better to replace it.
Removing the impeller is an option that makes cleaning and oiling the bearing for that end of the shaft easier. Don’t consider removing it if there is any chance that you don’t have the tools, bars or blocks suggested here or you might damage the shaft or impeller.
The impeller is a compression fit to the shaft of the motor so there is nothing to loosen. It is possible to remove it which allows easier access to the bearing. To remove it, use a brass rod smaller in diameter than the shaft opening on the impeller. This is necessary to avoid damage to the shaft end and the flat area on the impeller. Support the motor and impeller with something thin enough to fit between the motor and impeller with the impeller up and motor down. I use two pieces of 1/8″ steel bar stock. Support the bars on the sides of something like stacked 2 X 4 blocks so the motor is hanging free and supported high enough to drop away from the impeller when you give the end of the shaft a sharp blow with the brass rod and a hammer. Be very sure that the brass rod is not going to damage the impeller in any way and center it on the shaft properly. The motor should drop to the ground with 1 sharp blow to free it and maybe some light taps to remove it. So be sure to place something like waded up rags below the motor to cushion it as it falls from the impeller. This will prevent damage to the motor case.
Blow out all dust and dirt with a strong air stream or vacuum. Blow from the cleaner end and vacuum from the dirtier end. This is necessary to easily inspect the motor and clean it for better cooling under operation. Look at the windings through the vent holes in the motor end caps (doing so in direct sunlight helps). They should be varnished copper (dark but not black) in appearance and not burned looking. Turn the motor shaft by hand. This will indicate how dry and free the bearings are and allow you to check ALL windings for the same color appearance, there are several overlapping sets of windings. One burned winding will often be a different color than the one next to it. Smell can also indicate burned insulation caused by overheated windings. If they smell and looked burned, it is wise to replace the blower as well as the resistor module as a motor with burned windings or dry bearings will only cause more resistors to burn up, wiring to overheat, insulation and connector plastic to melt, speed selector switches to burn up and could possibly cause a fire.
Find a new blower motor here for about $50:
http://tinyurl.com/2001-2003Dakota-Durango-Blower
Other prices I have found were anywhere from $120 to $200 for the same motor with impeller.
I have been able to add lubricant (a good 30 weight oil) to a blower so that it would spin freely again. Follow all directions below and if the motor is not burned, it should perform like new and not burn up resistors until the bearings dry out again.
You should be careful to just apply oil into the bearings only (one at a time) for both ends of the shaft. After blowing out the dust and dirt hold the motor so that the shaft is vertical and slowly apply oil through the vent holes for the bearing at the bottom end of the shaft. Start with the non impeller end first, it’s easier to work on and will give you experience for the harder to do bearing if you have decided to not remove the impeller. Inject the oil so gravity keeps the oil on the bearing only. Using an oil can with a flexible spout or an old syringe will help. Slowly inject enough oil so that it runs out of the vent holes. After injecting the oil, support the motor with an empty vegetable or soup can or something similar to keep the oil off the motor brushes ( at the wired end) and on the bearing only. Allow it to sit for about 30 minutes to give the oil a good chance to soak into the bearing. After 30 minutes of soaking, turn the shaft by hand to get a feel if the shaft is freeing up as compared to your initial inspection. If it has, slowly turn the motor on its side being aware that any excess oil will drain out of the vent holes. If no oil runs out you could apply more and let it soak in for another 30 minutes. If oil does run out, allow it to rest on its side till all excess oil has run out. Now invert the motor so that the other bearing (impeller end) is down and repeat the oiling steps for that end (impeller shaft). If you should happen to get oil into any part of the motor other than the bearings, don’t worry about it shorting out the motor, oil is an insulator unless it has been contaminated. By now, the shaft should turn without binding. If not, go through the oiling process until it does. This will insure that the blower runs at the most efficient speed and current draw. It will also give you better heat and A/C ventilation.
When you are happy with the way the bearings are lubricated (free spinning shaft), carefully press the impeller onto the shaft with the open end away from the motor. This step has to be done right or the blower will suck and trying to remove it again could damage it because the rim is fragile compared to the base. You can start the shaft on being sure it is straight and finish it by laying the open end of the impeller on a board and pushing the motor down until the shaft hits the board and the end of the shaft is even with the impeller.
Just install the blower, new resistors and connector. Check for proper operation of the system and reinstall the duct work that was removed to get at the resistor module. Enjoy that feeling of Doing It Yourself along with great heating and cooling while driving.
Holy Mackerel!!
Thank you so much for your crazily thorough explanation! I will be using this to sharpen up my 1978 Dodge plow truck. Invaluable.
GREAT POST LYLE
BTW Where is the blower motor sold for $50?
I looked at Advanced, OReily, Murray and Auto Zone and all their blowers are selling for $100.
Your tiny URL didn’t work for some reason and I can’t figure out where youe were referencing.
Please advice. THANX!!!!!!!!!!!!!!!!!!!
Like everyone else, I would like to express my appreciation for creating this blog post. Without it I would have been replacing the wrong parts in my fan system trying to get it working.
That being said, something weird was happening while I was changing the part out.
After I changed the part, I tested the fan before reinstalling it into the ducking. For some reason it would not work. After playing with it for a little while I gave up and just installed the part into it’s proper place and figured I’d get back to it in a few hours. Once I was done installing it, I tested it again, and it worked.
Anyone have a guess as to why it worked fully installed, and not just plugged in on the floor?
I also wanted to mention that the factory might now be using the same aftermarket part. I picked up my new part from Autozone, and other than a single number on the part, it was identical to the one I removed from my truck (which was replaced under warranty 14 months ago at the dealership.
If I had to guess, I’d say that the blower might not have a return path for the electricity unless it is physically connected to the chassis ground. The wiring harness may carry only positive voltage, and no ground.
That technique is common with automotive wiring. You may find lamps have only one wire going to them. Where’s the return path for the electricity? It goes through the metal chassis when the bulb is installed.
Piper: I totally follow you, but that seems very unlikely since when we attach the assembly back to is the plastic vent housing.
Furthermore, now that it’s been a few days, my fan will not work consistantly. For example when I got into my truck this after, the fan was working at a low speed, but once I bumped it to full, it stopped working altogether. If I were a betting man, after the truck cools down (sometime tonight) the fan will start working again. Frustrating, any idea what my new issue might be?
I have replaced multiple resistors, my fan and the switchboard but my resistors keep blowing. It has 5 prongs or pins and it is always the second one that is blown. Any ideas?
Problem is with my 03 dakota. Fan stopped working on high last week. I would guess that it is prob resister again. Replaced that last year. Other Problem is that A/C stopped working this week. Light comes on on dash but doesn’t sound like compresser is kicking in and no cold air. If i press button for A/C again, the light will go off but it is delayed. Same thing happens when I press it to turn it on again. Could it be the dash switch or something else. Everything worked fne until a week ago. Are the two problems related? Help!!! Thanks
You just saved me 55 bucks install charges for the heater fan resistor. Thanks
My 2004 Dakota did the same yesterday. Hopefully it will be this $10-15 fix everyone is referring to. Crossing my fingers. THANK YOU!!!!!
Hey Ron – Just wanted to say you saved me here, man. I’m down here in Houston, and August is no time to be without air. Mine broke two days ago and sure enough as soon as I saw this I went out and looked under the hood and saw a wire that had broken from corrosion. A couple of minutes and a set of spade connectors later and I’m back to having a civilized truck.
THANKS!
My problem with 2002 dakota fan is opposite of others? Fan runs all speeds except full . I suspect I could bridge from pin 1 to 2 at zero resistance to get high speed back ?
Original part was replaced about 3 years ago. As I recall part was not different from the original Truck has not done much mileage since.
Will go in next lousy day & report back .
Well i BRIDGED ACROSS THE 1 & 2 pins by installing a similar size wire upstream of the wiring harness soldering both ends .
I could not get the connectors apart because I think of rust which was evident on the resistor pack parts in the air stream It now works at all speeds!
Makes you wonder why designer bothered to make a zero resistance connection inside the air stream?
Thanks Guys Cost me about 1 inch of solder & 8 inches of electrical tape
Truck-2003 Dakota QC 4.7L V8 Dodge has a myriad of design/engineering problems with this model they refuse to acknoledge, PCV freeze-off in extreme cold -25c (canada) caused a 600 dollar bill to discover! Bitch here the TSB fix covers every 4.7 built except ’03 Dakota. Anyhoo, to find a ten dollar self fix for the blower rocks! Thanx RB. p.s. still love this truck!, 4.7 has more nuts than anything simalairly equipped, especially full sizes, no supprise.
My wife has driven her 2004 Dakota all summer without air conditioning because the fan would not move any air. When it first started the problem was intermittent. Sometime it worked, sometimes it didn’t, then finally DEAD! Found out today from my auto mechanic that the fan motor draws too much power causing the wires to melt and destroy the above mentioned resistor component. He says that just replacing the resistor is not a cure. The original fan motor will continue to cause these types of failure. Any comments?
I might addd, our resistor got so hot the mechanic was unable to unplug it from the connector. The local Dodge dealer just gave him a bag of connectors for him to rummage through to find the correct one he needed. I don’t think I’ll be buying anymore Dodge trucks. He quit buying them several years ago when he had trouble with one his wife drove.
Well, my fan failed again 1 week after I installed the new resistor. I finally got around to working on it again today (impending cold propelled me). I started by pulling out the fan to see if it was frozen. It wasn’t but didn’t spin as freely as I think it might. I pulled it apart and oiled it as previously suggested. Once reinstalled, it still didn’t work. So I pulled out the resistor again to see if it was blown. It appeared to be mostly fine. on the connect side, the connector had previously been ‘scorched’ and that scrotching was transfered to the new resistor. while playing with the connector of the resistor (plugged in) the fan started working. This told me that my connector is the problem. I was able to get the connector to finally function. I do plan to visit a local junk yard in the hopes of finding an unburnt connector.
Having gone through this now, I’m guessing that was the real problem I had the last time I replaced the resistor.
my daughter has a 2003 durango 4.7, blower works only on high –will check the plug/resister thanks everyone
I have 2001 dodge dakota club cab also and the fan only works on high thought it might be the cabin filter but after searching for how to find the cabin filter came accross this site sounds just like the same problem I have thanks for posting this sounds like alot of people have the same problem
thanks bud’s, cost $16 dollars here in calgary at auto value (horizen square-north east)…2003 durango 4.7..thanks again, john…ps, it was burnt out, well one pin was anyway, mahalo again
changing the blower resistor worked. i was ready to spend over 200 bucks for this part. thanks everyone for your help with this.
My 2001 Dodge Dakota Quad Cab blower was only working on high. And in Hawaii, I definitely need A/C. After reading this blog, I bought the blower resistor and replaced it, and it works! Thanks for sharing the info and for saving me tons of money!
replaced the blower resistor switch and as it was melted had to use a screwdriver to knock melted plastic off of plug.tried it and now have a blower fan working again.thanks to all the comments here only cost me 15 dollars
Thanks for the great information. My fan stopped working tonight… After reading the posts, it wiggled the wires and the resistor. Now everything works fine again. Thanks!
Why do we buy these pieces of shit, this has been a problem since 95????
Greetings All
2003 DDQC. Went to the store on a cold day with heat going no problem. Came out to continue my driving and whammo, no heat control, just very low heat through the defrost……..having read enough posts and coming across this one, off I go to NAPA for a blower motor resistor card……thanks everyone for your stories
was without blower for 6 weeks,read this blog yesterday, picked up resistor at local dodge dealership less than $20.00,had it replaced in less than 20 min. Works fine now. (03QC)
I have replaced my resistor three times in seven months, this is getting very frustrating, the last time it blew in one day again. i have a 02 qc dakota. Im worried about the wire harness is starting to look fried on the end. I have herd there is a pig tail that I can use between the resistor, anyone know about that?
Great Post! resistor went on my 04 dakota and it melted the female pigtail end to the resistor male end. So I bought a new resistor and used straight connectors as suggested by many of you guys and it worked great. Saved myself $80 for a new female pigtail.
Thanks,
Brent